
By Louise Emma Clarke
Founding Editor of The-Beauty-Pages.com
It’s April already, which means we’ll be revealing a little more skin to the world as the weather starts to hot up over coming weeks and months. And if you have a complexion that is as pasty as mine (I actually think it looks blue in some lights), that means sticking to a strict Fake Tan Action Plan until we’re back in woollies come autumn. If your skin is pasty as mine, you’re more than welcome to join me in the three-step action plan below…
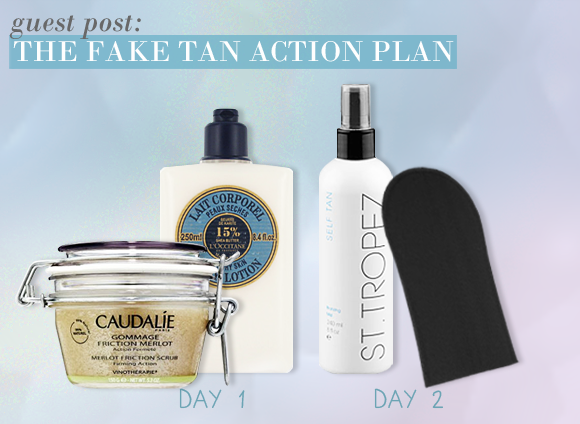
DAY 1
EXFOLIATE
It’s important that you spread the fake tanning process out over two days, as exfoliating and moisturising skin (crucial steps if you want a natural-looking tan) should never be done on the same day as self-tanning as it prevents the colour developing evenly.
The first step is exfoliation, which ensures that patches of rough, dry skin are smoothed away. If you skip this step, you’ll find the fake tan soaking into these areas and leaving telltale dark patches that reveal your Caribbean glow comes from a bottle! Spend extra time working on your knees, elbows, ankles and base of each hand, which are prime offenders for giving the game away!
Look for a salt or sugar-based scrub that has a thicker, coarser texture – the creamy versions can be very luxurious and indulgent, but you need something that is going to be abrasive enough to smooth and soften those dry patches. I love Caudalie Merlot Friction Scrub, £21.50, which contains grains of sugar to effectively slough away dead skin cells, along with essentials oils of lemon, peppermint and sweet mint for a spa-like shower experience.
MOISTURISE
Always follow exfoliation with a generous application of moisturiser, paying close attention to the same areas that are prone to dryness. I like to do this just before bed, slathering on a thick layer of cream to absorb overnight as I sleep.
Ingredients to look out for include the powerfully hydrating (yet gentle and skin soothing) Shea Butter, Cocoa Butter, or Almond Oil. For me, it’s hard to beat L’Occitane Shea Butter Ultra Rich Body Lotion, £18.
DAY 2
FAKE TAN
The next morning (or whenever you have the time the following day), start by gathering your tools for fake tan application. You need a good quality bottle or pot of self-tan – whether you choose lotion, mousse, or spray is down to personal preference – along with a mitt to ensure a perfect, even-toned application.
For me, St Tropez is still the best brand out there, delivering a colour that is hard to distinguish from a real tan (but a lot cheaper, safer, and quicker to achieve). I’ve tried all the different forms, but my current favourite is Self Tan Bronzing Mist, £28.80, which I find a doddle to apply. To minimise the chance of mishaps (fake tan splattered carpet, anyone?), stand in the bath and pull the shower curtain before spraying a fine mist over your body and face. Once completed, use the brand’s Soft Mitt, £3.36, to gently buff the colour into skin, spending a little extra time on knees, ankles, and elbows. Make sure that you’ve covered every visible patch of skin – behind your ears, the back of each arm and leg, and right up to your hairline.
If you’ve got time, allow 10-15 minutes for the colour to fully dry before getting dressed (ideally into something loose and flowing) – and then wait for the colour to develop slowly over the day ahead. Those pasty limbs will soon be nothing but a distant winter memory!
Shop this post


BeachGG
L'Occitane Shea Butter Rich Body Lotion 250ml

My husband who has very dry skin loves this stuff. He asks for it for his birthday, father's day, etc. It's a bit pricey but it works. It's the high level of shea butter.
